tag on every page of your site. -->
Showing posts with label Android. Show all posts

Sunday, 8 April 2018

How To Turn Any Android Phone Interface Into An iPhone 10 Interface

I got an email recently with a bizarre suggestion and a link to apps that let you turn your android phone interface into iPhone 10 or iPhone X interface. Then I thought in my mind why would anyone want to turn Android phone into iphone?

Obviously your Android phone will not magically turn into iPhone 10, but what this app developer did is an iPhone 10 launcher for Android.

One of the great things about Android device is that you can do some pretty weird stuff out of the box, you can install any launcher that you want and there’s plenty of good ones and weird ones.

Maybe there’s a little bit of practicality for individuals coming from iOS super familiar with the iPhone 10 gestures and want to switch over, truthfully I think this idea is more of novelty.

Nonetheless, I have been asked to check it out, so I went ahead and do so.

There are bunch of this apps on the Google playstore, I never imagine this eco system even existed anyhow, I selected the first one in the search result, Phone X launcher this particular one already has over a million download.

Phone X launcher turns android into iPhone X, iOS 11 & control center iOS 11 with iLauncher.

In the past I showed you guys an app that put the iPhone 10 notch on any android phone, Phone X launcher obviously goes a step further, but some of the implementation here is similar.

Turning an Android interface into iPhone X interface


To start the Phone X launcher you pick an iOS inspired wallpaper, enable permission for notification access.

Firstly I tried swiping up my pixel 2 XL really felt like iPhone 10, at the top I have a different look and feel to the quoa to the reception meter after clicking it I got a notch on the launcher which really looks bizarre.
Install Iphone launcher on Pixel 2 XL

I think if you have the pixel 2 XL this is probably the last thing in the world you thinking about doing, maybe if you have some older android phone and you are sick of it for some reason and this may change it a little bit for you, gives you icon that looks like iPhone, anyway it puts you in the same territory so you can catch your width of the Apple universe and it’s funny you see chrome with safari logo, actually I can’t recommend it.

If you want to completely change the look and feel of your android phone, download something like Nova it’s also free and has about 50 million download and it’s real legit, you can change everything about the look and feel of your android phone.

With Nova you can change the size of logo, you can swipe out individual logo do lot of stuffs, I personally recommend this other than changing your android device into iPhone 10 interface.
Read More »

Wednesday, 8 November 2017

4 COMMON ITEL (ANDROID) PHONE PROBLEMS; HOW TO FIX THEM AND OPTIMIZE YOURS FOR BETTER PERFORMANCE

I’m dedicating this to those who want to enjoy and explore the Android experience but are not buoyant enough to exit entry level smartphones. Itel now has models running on Mediatek and Spreadtrum so you can tag along if you have any Mediatek (MTK) or Spreadtrum (SPD) entry level smartphone you wish to optimize for a better experience.
4 COMMON ITEL (ANDROID) PHONE PROBLEMS; HOW TO FIX THEM AND OPTIMIZE YOURS FOR BETTER PERFORMANCE

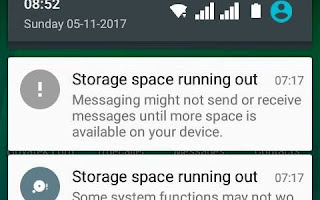
1. STORAGE SPACE RUNNING OUT

Messaging might not send or receive messages until more space is available on your device. Some system functions may not work. This is one of the first hurdles you’ll encounter once you’ve started installing apps.

What is this error and why am I getting it?

Your phone has an internal storage where apps and their data are installed to / saved. The problem here is that its a partition which is allocated a limited space so you could have a lot of space on your external SD card and Phone storage but still encounter this error. The root of this error is that you’ve used up the allotted space for apps and their data either due to that space being too small or you having installed too many apps.

Solution

  1. Adoptable Storage: This enables you use your external SD card as an extension of your internal storage
  2. Clear app data: The phone needs to first be rooted then the internal storage analyzed for apps (and their data) consuming a lot of space using Link2SD. I once recovered 3.72 GB from clearing just one app’s data
  3. Delete media and uninstall unneeded apps: Delete heavy media files saved to phone / internal storage or move them to external SD card. Also uninstall all unneeded apps under Settings > Apps
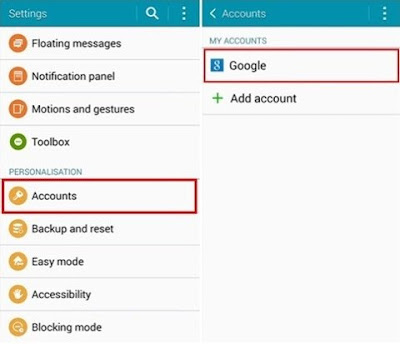
  4. Factory Reset: First, backup your important stuff. Go to Settings > Accounts and delete your Google account to avoid Factory Reset Protection (FRP) . Go to Settings > Backup & reset to wipe the phone or boot into recovery mode and do a factory reset


2. LAGGING / HANGING

Slight lagging is something to expect with use but its particularly terrible on low RAM phones. This could result in frequent restarts or unfortunately **** has stopped errors.

Why is my Itel phone lagging / hanging seriously?

Well, first off, Itel isn’t exactly notorious for being generous with RAM on their models. Apart from the Itel S11 Plus , Itel Wish A41 Plus , Itel S41, and maybe a model or two I forgot to mention (which I kind of doubt), Itel phones traditionally feature either 512 MB or 1GB of RAM. Now, the problem isn’t only the low RAM but also the system apps (Bloatware) which the phone is bombarded with from factory.

Solution

  1. Debloat: First, you need to root your Itel phone then uninstall unneeded system apps using an app like Link2SD. I strongly recommend that you either have a compatible packet (pac) file / stock rom / firmware for your Itel phone or do a backup in custom recovery first so you can easily rollback incase the debloating exercise goes South
  2. Create a ROM Zero: To create a stock flashable zip (ROM Zero), all you need is a custom recovery, stock boot.img and system.img . If you have the Mediatek firmware then you’ll find boot and system in the zip or rar file. For Spreadtrum pac files, you can extract the content of the pac file using Research or Upgrade Download tool.
  3. Close apps not in use: Other than apps that have push notifications (e.g Email, Whatsapp, Hovatek app etc), ensure to exit apps currently not in use


3. OVERHEATING / QUICK BATTERY DRAIN

Unless you’re using an Itel phone with 5,000 mAh, you’re likely to encounter a relatively short battery time. This is often facilitated by or coupled with overheating. Someone exaggerated that he could cook beans with his Itel phone ? .

Why is my Itel phone overheating and battery draining so quickly

Low end / entry level phones don’t handle duress too well and overheating is one way they voice out. Its quite normal to notice your Itel phone warming up slightly while charging or using but if it gets really hot then there’s likely a hardware issue lurking in the dark. Low end phones with crappy hardware will overheat regardless of what you do but Itel isn’t exactly crappy.

Solution

  1. Turn off radios not in use: If you’re not actively using your Bluetooth, Wi-Fi, Hotspot or 4G then turn them off
  2. Watch the apps you run: Entry level phones aren’t for gaming so don’t push them. You should also reduce the number of apps you run at a time and check to be sure your phone isn’t infected with malware
  3. Reduce screen brightness: Unless you’re a Mole, your screen doesn’t have to be so bright all the time
  4. Pay attention to your Charger: If a particular charger makes your phone heat up significantly when charging then you should stay away from it


4. USB CONNECTION ISSUES

When it comes to USB connection, Spreadtrum (and by extension Itel phones) are another kettle of fish. Some of these issues also surface on Mediatek smartphones though.

What are the USB connection issues I might encounter on my Itel Android phone and how do I resolve them?

  1. ADB detection issues: Getting ADB to detect your Spreadtrum phone requires an additional step which is to include your Spreadtrum Vendor ID in the adb_usb.ini file
  2. MTP issues: An MTP issue could result in your PC being unable to detect your Phone storage and external SD card. Fixing this requires that you update your phone’s MTP drivers
  3. Flashing tool detection issues: Before you attempt flashing a Mediatek or Spreadtrum device, you need to install the Mediatek VCOM or Spreadtrum Sciu2S drivers respectively. Unfortunately, that’s sometime not enough as you might still get errors which point at a detection (driver) error. In such a case, you’ll need to update the Mediatek or Spreadtrum phone’s drivers under Device Manager

Itel has made notable improvement and I believe they hold promise. I’m watching this brand keenly and only time will prove me right or right.

This post was first published on Hovatek Journal, if you want to download the external files mentioned in this lecture, kindly check Hovatek Post.
Read More »

Sunday, 2 July 2017

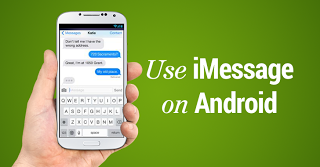
Quick Guide to Get iMessage on Android

How to Receive iMessage on Android?


iMessage compatibility is no more an issue these days. And, that too if you want to talk to people who use the same plan as that of yours, then iMessage compatibility will never be an issue. It is very much understood that those people in your plan are either iOS users or Android users.

iMessage is a very simple service that is provided by Apple. With the help of this service, you can send texts, documents, group messages, contacts and photos. All these messages can be sent with the help of Wifi. This feature is very easy to use unless you are someone who is using an Android phone. For more information, click here.
How to get iMessage on Android?

All the Android users have been seen complaining that they do not receive iMessages on their phone. Because of this, they receive messages that are segmented and most of the time, miss out on important details. On the other hand, iOS users also keep sending messages to their Android friends and they do not get them.

As of now, there is no official way of getting messages on your phone. But, you can always get iMessage on Android
if you follow these steps.

  1. Pie Message is a very special project that can be installed by the users on their device.
  2. This project is still in its development stage and you should only install this if you are experienced enough and are also ready to take risk.
  3. This is a project that was started by GitHub user Eric Chee. If you want to install it, you will need a Mac and an Android phone. 
  4. This means that Pie Message needs an OS X client that can help in transferring messages to an Android device. Mac plays a very important role here as it is the one that helps in the transferring of the messages. 
  5. The message is sent by the Android to Mac and then Mac sends the message in the form of a notification.
  6. If Mac also detects an incoming message, that is also transferred to the Android.


HOW DOES IT WORK?

  1. After you have installed Pie Message, it works as follows.
  2. It will use an Apple script and will capture iMessages as soon as they arrive on your Mac system.
  3. After this, the Java app takes all those messages from Apple script.
  4. And then, that message is forwarded by Java app to a custom messaging application on the Android phone.
  5. The message will be displayed on the Android phone and then it will respond to those iMessages.


LIMITATIONS OF THE APPLICATION:

  1. The Mac has to stay awake always in case it wants to send the message on time.
  2. If Mac is turned off, the messages will not be received anymore.
  3. As explained above, it works by routing iMessages from Mac to Android phone.
  4. As of now, the application does not work with photos, or group messages
Read More »

Monday, 19 June 2017

Quick Guide to Change GPS Location on Android

GPS location on Android Phone can be easily changed by following these simple steps.

Quick Guide to Change GPS Location on Android

Android operating system is powered by Google, which makes virtually all android device have a default Google Map (Location Tracker) pre-installed, however Google enables Location tracker to be disabled if need be on Android Phone. Disabling Google location tracker doesnot mean your current location will change or undetected, but with the use of apps you can alter your immediate location to anywhere in the world.

REASONS WHY YOU MAY NEED TO CHANGE YOUR ANDROID LOCATION.

  • You change android location to have access to location restricted apps or site. 
  • To fake your friends or family about your current location on social medias. ? 
  • To bypass web restrictions. 

CHANGING GPS LOCATION: WARNING

Before Changing GPS location on Android
Phone you must know this action is totally against the policy of some apps like Pokemon Go, you should be aware that the app developers, Niantic, don’t look too kindly on this behaviour. If detected, you could find yourself locked out of the game for several hours as a punishment, and continual abuse could even bring about the deletion of your account.

DISCLAIMER: The information contained in this post is for general information purposes only, read more.

HOW TO CHANGE GPS LOCATION ON ANDROID PHONE: GETTING AN APP


Obviously the GPS in your handset is set up to be accurate, so you won’t find any easy way of altering its calibrations in Android itself. To do this you’ll need an app. Head over to the Google Play Store and search for Fake GPS. This will bring up quite a range of apps to choose from. Most of these will use something called Mock Location, a Developer setting in Android.

This is the perfect choice after testing several fake GPS apps, you can choose the pro version.
Download fake GPS location spoofer

HOW TO CHANGE YOUR GPS LOCATION ON ANDROID: CHANGING YOUR LOCATION


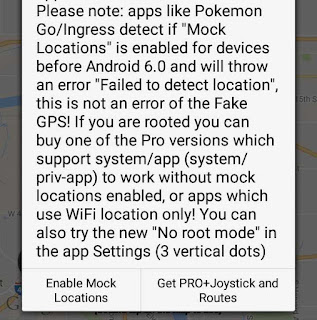
Once you’ve installed Fake GPS Location Spoofer Free and launched it for the first time you’ll see a long message telling you that Allow Mock Locations needs to be enabled. At the bottom of the dialog box there is the option to Enable Mock Locations.
Enable mock location on GPS location spoofer
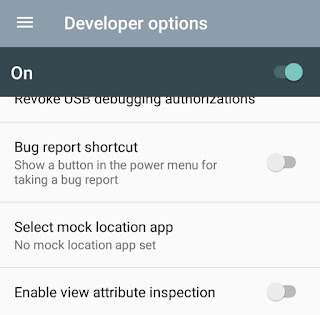
You will enable mock location under developers option.

If you don’t have developer options already activated, as the app will explain. To enable these go to the Settings menu and scroll to the bottom of the list until you find the About Phone section. Tap this then scroll to the bottom of the next list until you find Build Number. Tap this repeatedly, it takes about seven or eight presses, and you’ll be told that the developer mode has been activated.

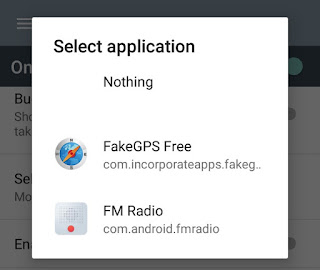
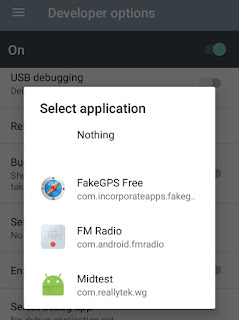
Return to the Settings menu and scroll down to the bottom where you’ll see Developer options. Tap this then scroll to the Debugging section and look for Select mock location app.
Quick Guide to Change GPS Location on Android

Tap this then select FakeGPS Free from the list of apps that appears.
Quick Guide to Change GPS Location on Android

Now go back to Fake GPS Location Spoofer and the screen will show a map of your current location. To change your location double tap the place on the map where you want the GPS to be sited then tap the Play button in the bottom right corner.
Quick Guide to Change GPS Location on Android

The app will now show that as your location whenever you or another app accesses the data. To turn it off again simply go back to the map and tap the Stop button in the bottom left corner.

HOW DO I CONFIRM  IF MY CURRENT LOCATION IS COMPLETELY CHANGED? 

  • Go to Google.com and search “My current location” without quote. 

My current location
It will display your custom location as your actual location.

Note: Make sure you deactivate location in phone settings.

That’s it. Now you can hide your activities from snooping eyes, without leaving the comfort of your zone. 
Read More »

Friday, 28 April 2017

How to Operate Multiple Acount For All Applications and Games on Android Phone

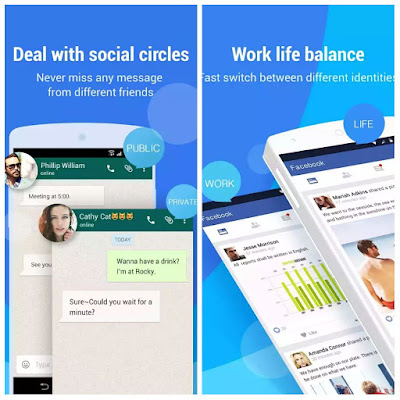
Do you have two accounts for Messaging, tired to log in and out to receive different message? Do you have multi game accounts, want them all online to get double experience? Do you have double social accounts for work and personal life,wish them to parallel? If your answer to these questions is Yes, you’re lucky to see this article.
Go multiple android app
Damtops edited screenshot

Interestingly, there is a way you can operate your multiple account with easy tabs on your Android smartphone. Here I will discuss an easy to use procedure that allows Android users to enjoy multiple accounts on their smartphone.

What does it mean to operate Multiple account?


Actually, most people like to be anonymous on the internet to secure their personal identity, by doing so, most people prefer to have a public contact and a private contact.

Assuming you want a public contact for your businesses, a public phone number, Facebook account, messenger, whatsapp, instagram and other network people can use in contacting you, also you want a private social media account for just your family and friends, you can enjoy both contacts on one Android phone. (These idea brought about double SIM phone).

You can operate multiple Messenger account, Whatsapp, Instagram, Twitter and Games.

How Can I Operate Multiple Account on My Android Phone?


The GO Dev Team X based in China developed an app GO Multiple – parallel account that is designed for users who log in more than Two Accounts of One App with only One Phone, while the data of your main account and second account are in parallel and separate storage.

Firstly, go to playstore and download Go multiple – parallel account for free.
Download go multiple android app playstore


After successful installation, launch the app, then swap to the left twice.

click on CONTINUE WITH ADS, if you don’t want ads display you can upgrade your account by clicking Upgrade & Remove ADS.

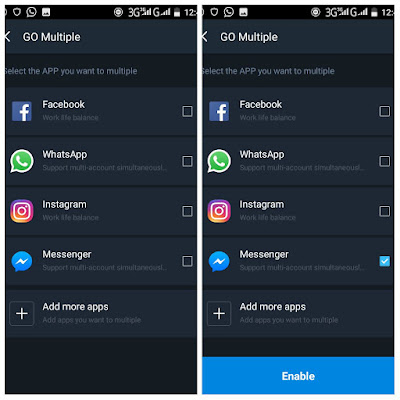
You’ll see the common apps listed already, which you can also add your already installed apps by clicking ADD MORE APPS

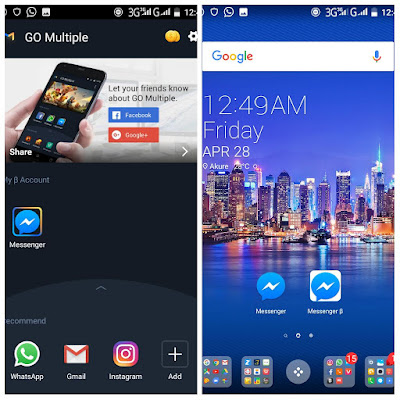
select your preferred apps by clicking the check box in front, click Enable. I will be using facebook messenger as example for this tutorial”
Go multiple settings


The app icon will be created automatically not minding that you have one account already on your phone.

Click the newly created app icon, and register/login has usual.

Now I can enjoy two messenger account on my Android device.

Note: To all android game geeks, you can also use this app to duplicate accounts on your favorite games.

Features of Go Multiple App


  • Upgraded UI, clear notification to help you fast switch between two accounts.
  • Parallel Function, separate storage, zero conflict!
  • Small and low CPU consume. 
Read More »

Saturday, 15 April 2017

List of Infinix Smartphones That Will Receive The Version 7.0 Nougat Update

As technology is advancing so also our dear smartphone is advancing both in software and hardware just to meet up with major high-end performances. This has led to the release of the current version 7.0 Nougat operating system to enhance the Android phone capability.
List Infinix smartphone  receive nougat v7.0 update

Some Android brands are already receiving the new version 7.0 update, which I know a lot of Infinix smartphone users are anticipating when and if their smartphone will be receiving the version 7.0 nougat.

I have gotten an official update on when and which Infinix smartphone will be receiving the 7.0 nougat between April – July 2017… Actually Note 3 and Zero 4 have already received beta upgrade some couples of weeks back and this is now official.
Infinix nougat update

These are lists of Infinix Devices that will be receiving Android 7.0 Nougat


Zero 4 From M to N : End of April

Note3 From M to N : End of April

Zero 4 Plus
Beta 1: 25th Of May
Beta 2: 15th Of June
GM : 15th Of July

Hot S
TBD updating soon

Hot4 pro
Beta 1: 30th Of April
Beta 2: 20th Of May
GM : 5th of June

Hot4
Beta 1: 30th Of May
Beta 2: 20th Of June
GM : 20th of July

The updates are officially scheduled to rollout from April to July 2017.
Read More »

Saturday, 11 March 2017

How to Easily Remove Junk Files Caused By WhatsApp and Other Social Media Apps

Without doubts WhatsApp is the most used one-on-one messaging app in the world, we all enjoy services rendered by WhatsApp Inc ranging from sharing pictures, videos, txt files and mp3 file etc, but one time all these shared files may later result to many junk files on our mobile phone. Sometimes when you switch on your mobile phone or open your WhatsApp messenger it takes longer time to boot up or open, this is most times the result of too many junk files on your SD card or internal memory.
How-to-Remove-Junk-Files-Caused-By-WhatsApp.jpg

Junk files don’t really mean corrupt files, but files that have no usefulness or duplicated files that consume space on your device that renders your device slow. Junk files are mostly gotten from downloading files from Social Medias.

Don’t Miss: How to Stop Social Media Apps from Automatically Downloading Files or Consuming your Internet Data

As a typical example, I happened to be added to various WhatsApp groups where most times people share irrelevant files (especially pictures) but I refrained to leave these groups because they serve as means of advertising my services, you know what it means to have over 200 people in a group at least there will be 2% conversion for any product you advertise in such group, but how I do take care of these junk files shared on WhatsApp groups is what I want to discuss today:

The procedure I will show you takes care of the following:
  1. Your phone becoming slow and its battery draining faster?
  2. Not having enough space on your phone because of WhatsApp photos?
  3. You have a lot of duplicated photos in your camera gallery?

If your answer to these is ‘Yes’, then follow the steps below to get rid of junk files on your phone.

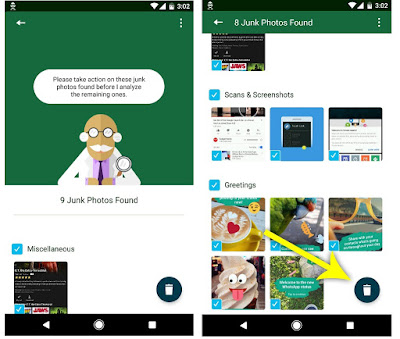
To effectively get rid of junk files gotten through WhatsApp a development team at Siftr Lab developed a mobile app, Siftr Magic Cleaner.

Siftr Magic finds all the junk photos piling up and taking up space in your phone. It incredibly knows what’s important to you and what’s trash. It’ll smartly separate the two so you can simply remove all the junk in just one tap. Siftr Magic Cleaner supports WhatsApp, Line, Viber, Telegram and Hike.


If you’re ready to clean up old junk photos from your WhatsApp conversations to save storage space.
1. start by installing Siftr Magic Cleaner.

  • Install Siftr Magic Cleaner for free from the Google PlayStore 
Siftr magic clearner apk download

2. After installation, open the app and grant all permissions.

3. Scan for Junk Photos & Delete Them Easily
How-to-Remove-Junk-Files-Caused-By-WhatsApp.jpg

After doing so, check your device’s available storage by heading to Settings. Chances are, if you’re a heavy WhatsApp user, you just saved a ton of storage space in a few simple taps!
Read More »

Wednesday, 8 March 2017

How to Easily Extract and Save Apps Downloaded from Google PlayStore on Your SD card

Files (pictures, documents, videos, and apk etc.) Downloaded from the internet are usually saved in an SD card or phone internal memory, but apps downloaded directly from Google PlayStore are hidden on SD card or internal memory, because they are saved as .asec extension inside .android_secure folder instead of the usual .apk extension.

This feature makes it difficult for people to share or upload apps downloaded directly from Google PlayStore with friends on the internet, keep an earlier version of an app before updating to a newer version, or for any other personal purposes.
How to Easily Extract and Save Apps Downloaded from Google PlayStore on Your SD card

So, in this post I will show you how to easily extract and save apps installed from Google PlayStore anywhere on your SD card.

There are two ways to extract an apk file installed from PlayStore, the first method requires an app called Apk Extractor while the other method, you will need to have two devices connected together either through Wi-Fi or Bluetooth. For this tutorial I will be using the earlier method because it’s a lot easier, faster and No ROOT access required.

How to Easily Extract Apps Installed from Google PlayStore on Your SD card Using Apk Extractor


Apk Extractor will extract Apk that are installed on your android device and copy them to your SD card.

Note: by default when you install Apk extractor on your android phone, your extracted apks will be saved in /sdcard/Extracted/Apks/.


  • Download Apk Extractor for free from Google PlayStore


After installing, open the app and navigate to the app you want to extract > click on the app.

In seconds, your apk will be successfully saved on your SD card.

Don’t forget to share this post with friends through the social media icons on your screen.
Read More »

Wednesday, 1 March 2017

How to Set a Charging Limit on Your Android Device to Avoid Excess Battery Wear

Everything in life has a lifespan, but the way we use this stuffs determines how long they will stand the test of time, this notion is also applicable to our Android gadget most especially the part that store energy (battery).

Android battery lifespan is mostly determined by excess heat and frequent overcharging or undercharging, this has led to a lot of conflicting information out there when it comes to the best habits for charging a smartphone’s battery, so let’s clear some of that up right off the bat. Lithium ion batteries (the type used in most modern electronics) start to lose their ability to hold a charge over time, and the two biggest factors that contribute to this are excess heat and overcharging.
How to Set a Charging Limit on Your Android Device to Avoid Excess Battery Wear

In a cruel twist of fate, the act of charging your phone’s battery causes it to heat up, and topping it off to 100% charge contributes to reduced capacity over time. To be more specific, ResearchGate found that charging a battery to only 85% yielded a longer lifespan than charging to the full 100%. This is not even getting into the whole Note7 exploding battery fiasco—which, by the way, Samsung once tried to remedy by issuing an update that limited the phone’s battery to 60%.


Knowing that charging to a full 100% isn’t the best practice for long-term battery health, developer harsha1397 created a root app that lets you choose your own charging limit. It’s not compatible with every device, but if it works for yours, you can simply set a percentage, then your phone will automatically stop charging once it hits that threshold.

Don’t Miss: How To Find People’s Phone Number By Using Their Name

Requirements

  • rooted Android device
  • Android 4.4 or higher

Step 1

See if This Mod Will Work on Your Phone

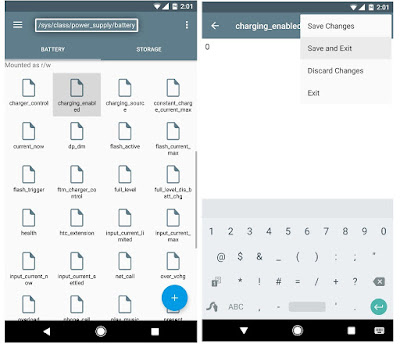
First up, you’ll need to make sure this app will work with your particular device. To do that, start by plugging your phone into a charger. From there, open your favorite root file manager, then navigate to the /sys/class/power_supply/battery folder. Next, open the charging_enabled file with a text editor, delete the number 1, and then replace it with the number 0. When you’re done there, save the file.
At this point, your phone should stop charging, so head to your battery menu to verify. If the device continues to charge, it’s not compatible with this app.
How to Set a Charging Limit on Your Android Device to Avoid Excess Battery Wear

Once you’re done with this quick test, make sure to restart your phone. This will reset the number in the charging_enabled file back to 1.

Step 2

Install Battery Charge Limit

Now that you know your phone is compatible, it’s time to install the app. To do that, grab the APK from the following link, then tap the Download complete notification and press “Install” when prompted.

  • Download Battery Charge Limit (.apk)


Step 3

Set a Battery Charge Threshold

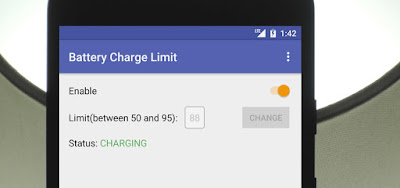
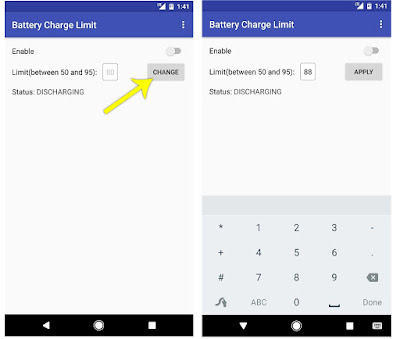
Next, open the app, then tap the “Change” button next to the Limit entry. From here, type in a percentage between 50 and 95 (this is when your battery will stop charging), then press the “Apply” button.
How to Set a Charging Limit on Your Android Device to Avoid Excess Battery Wear

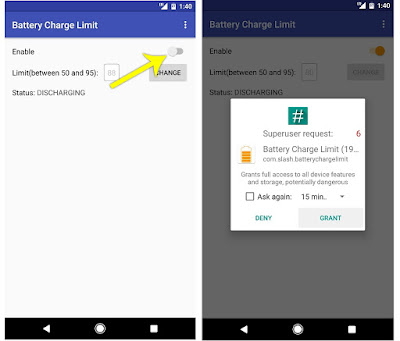
Toggle the Enable switch at the top of the screen, then Battery Charge Limit will ask for Superuser access, so tap “Grant” on the popup. Once you’re done there, you’re all set to go.
How to Set a Charging Limit on Your Android Device to Avoid Excess Battery Wear


Step 4

Enjoy a Healthier Battery

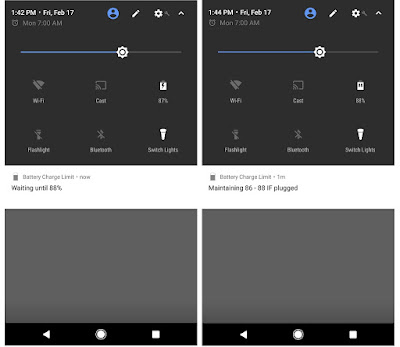
From now on, you’ll see an ongoing notification from Battery Charge Limit whenever you connect your phone to a charger. This is the only time the app runs in the background, so it doesn’t have any impact on battery life. Then, once your battery hits the desired threshold, charging will immediately stop.

The app will keep the device from charging until the battery level falls by 3%, at which point it will temporarily allow charging again, then repeat this same cycle. Over time, this practice should lead to a more healthy and longer-lasting battery.
How to Set a Charging Limit on Your Android Device to Avoid Excess Battery Wear

If you care about your smartphone enough to monitor battery levels while charging, then you probably have a true passion for technology. If so, that’s exactly the type of person we’re looking for as we make several post on how you can fully enjoy your desirable gadget, feel free to subscribe to our newsletter and get our post updates directly into your mail box.


credits: Android How-to
Read More »

Monday, 27 February 2017

How to Keep Porn Away from Your Kids with This Root Content Blocker for Android

The internet’s an amazing place. The entirety of human knowledge is now accessible in an instant, and all sorts of media can be streamed directly to the palm of your hand. But, of course, that also includes the darker side of humanity, so there’s plenty of NSFW content floating around out there that’s certainly not suitable for children.
How to Keep Porn Away from Your Kids with This Root Content Blocker for Android

Porn and other risqué media is now more prevalent than ever, so as much as your kids can benefit from having access to a smartphone or tablet, you still have to be vigilant and keep an eye on their internet usage. Even a seemingly innocuous site can have some seriously indecent pop-up ads, so it’s a hard thing to really keep track of.


Thankfully, developer Mahadi Xion has an app that should help quite a bit. It’s a ported version of the popular content blocker AdAway, but customized to specifically block porn sites and popups instead of ads. Fair warning, though: You will need to root the phone to pull this one off, but if you can stick with it and overcome that first hurdle, the rest of the set-up process is fairly easy.

Don’t Miss: How to Set a Charging Limit on Your Android Device to Avoid Excess Battery Wear

How to use PornAway to Filter Site on Android Phone 


1. Install PornAway: Once you’ve got the device rooted (or if it was already rooted to begin with), the first thing you’ll need to do is install the porn-blocking app, which is fittingly called PornAway.

  • Download the PornAway content blocker app (.apk)


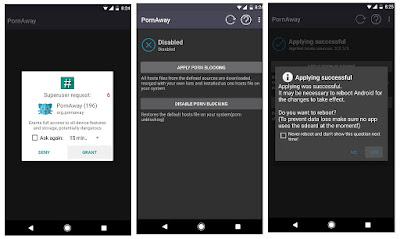
2. Patch Your Hosts File & Reboot: open PornAway, then within a few seconds, you’ll be prompted to give the app root access, so tap “Grant” on the popup. From there, press the “Apply Porn Blocking” button near the top of the app’s main menu, then tap “Yes” when asked to reboot the phone.
How to Keep Porn Away from Your Kids with This Root Content Blocker for Android

It’s worth noting at this point that PornAway functions exactly the same as AdAway, and that’s by modifying the device’s hosts file to add a blacklists of sites that simply won’t be allowed to load. This makes it very effective at blocking content, but it does have one downside: It won’t work in conjunction with AdAway, since the two apps modify the same file.

Unroot (Optional)
Once the device finishes rebooting, you can completely uninstall PornAway if you’d like, as the app has already done its job. While you’re cleaning things up, you may also want to unroot the device, which would be helpful if you have a teenager who you think might be compelled to undo your porn-blocking modification. Without root, there will be no way to revert the modified hosts file, so porn content would be permanently blocked on this device.


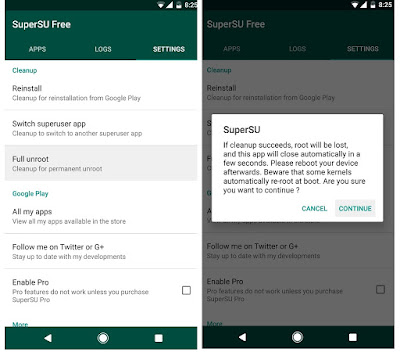
So if you’d like to unroot, open the SuperSU app from the app drawer, which was installed automatically when you rooted the device. From there, head to the Settings tab, then scroll down a bit and tap the “Full unroot” option. Finally, press “Continue” on the popup, then wait as long as a few minutes while the process takes place. When it’s done, the phone will reboot and it will be completely unrooted.
How to Keep Porn Away from Your Kids with This Root Content Blocker for Android


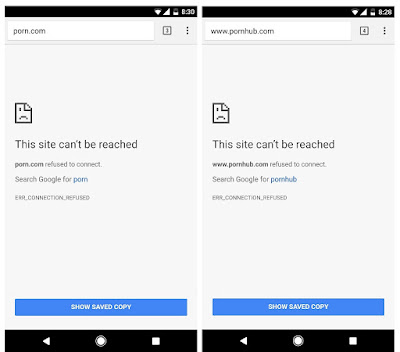
Enjoy a Kid-Safe Smartphone, from now on, porn sites will simply refuse to load on this device. The porn-blocking blacklist is quite extensive, so every major site in this category is blocked. Of course, it’s possible that a new porn site might be created and make its way through in a rare situation, but the internet should now be a much safer place for your children.
How to Keep Porn Away from Your Kids with This Root Content Blocker for Android

Don’t forget to share the post with friends and family on social media.

Credits: Android-How To
Read More »

Thursday, 23 February 2017

How To Remove Gmail Account Connected to An Android Phone

I operate multiple Gmail accounts which I always like to get inbox notifications just as I receive SMS or Whatsapp messages, the only means I can get my Gmail notifications is through the in-built Gmail app on my Android Phone, which works pretty cool.

It came to a time I wanted to remove one or two Gmail accounts attached to my android device, which requires some easy steps, but if you don’t know these steps it may seem difficult to remove. So, I will show you the easy steps to remove Gmail accounts attached to your Android phone.

There are two methods for you to remove account. One is to reset your phone and the other is to delete your account. The former will clear all your files in the internal storage, and is not highly recommended if you just want to delete Gmail on Android. Here, we will mainly focus on the latter one.

Don’t Miss: How to Set a Charging Limit on Your Android Device to Avoid Excess Battery Wear


The steps to remove gmail on Android OS Jelly Bean and KitKat is quite different from Lollipop and above.

Now I will walk you through the details about removing Gmail account from different Android operating system.

Steps to Remove Gmail Account from Android 4.1 – 4.3 and 4.4 OS


Step 1: Go to “settings” > Click “All” at the top> Scroll down to “Account” > Select “Google” and select the account you want.

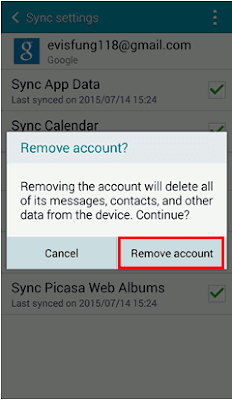
Step 2: Tap the menu icon. Select “Remove account”.


Steps to Remove Gmail Account from Android 5.0 OS and Above


Step 1: Go to “Settings” > “Accounts”. Select “Google” and select the account you want.

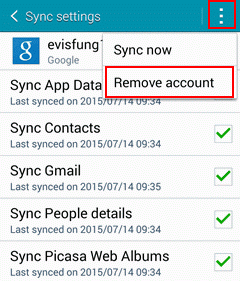
Step 2: Tap the menu icon. Select “Remove account”.

Step 3: Click “Remove account” on the pop up and confirm to delete your Google account from Android. Note that removing the account will delete all of its messages, contacts, and other data from the device.

That’s it. The whole process is quite easy, right? Your Google account has been removed from your Android phone. If you want to sign in with another account, just read How to Add Google Account on Android Device.

Credits: Recovery-Image
Read More »

Saturday, 11 February 2017

How to Make Your Android Keyboard Play Sound as You Type

Android is a highly customizable operating system. Sometimes, we use these capabilities to add core functionality or streamline the user experience, but there are other times when customization is just about having fun and making your smartphone’s interface more enjoyable.

The latter is the category where a new app from developer Ouadban Youssef comes into play, as it turns any Android keyboard into a musical instrument of sorts. You can pick from several synthesized strings, horns, and percussions, then every letter on your keyboard will play a different note as you type. It’s really a fun little tweak, so I’ll show you how it works below.

Don’t Miss: How to Use Android Phone Has Microphone with Bluetooth Speaker


Install Keyusic 

To turn your keyboard into a musical instrument, start by installing Youssef’s app, which is called Keyusic – Keyboard Sounds.

  • Install Keyusic for free from the Google Play Store
make android keyboard play sound as you type

Enable the Accessibility Service

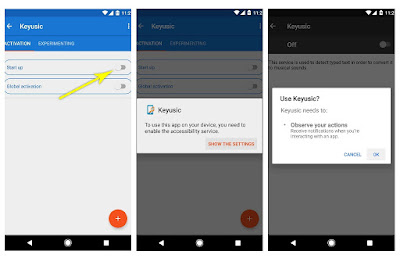
Open Keyusic, then tap the toggle switch next to the “Start up” option. From here, you’ll be prompted to enable the app’s Accessibility service, so tap “Show the Settings” on the popup. After that, select Keyusic from the list, enable the switch at the top of the screen, and press “OK” when prompted.
make android keyboard play sound as you type

Enable the Musical Keyboard

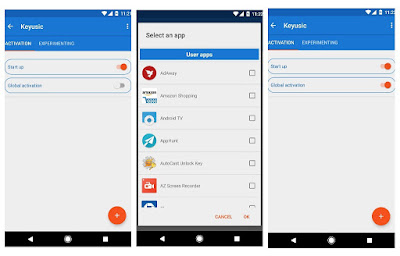
With the Accessibility service enabled, head back to Keyusic and tap the “Start up” toggle switch again—this time it’ll actually turn on. From here, you’ve got two options: Either tap the + button at the bottom of the screen, then select individual apps that you’d like to use the musical keyboard in, or simply enable the “Global activation” switch if you’d like to use the musical keyboard in all of your apps.
make android keyboard play sound as you type

Enjoy Your New Musical Keyboard

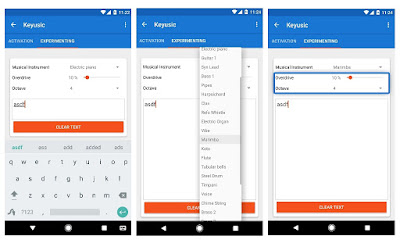
From now on, your keyboard will simply make music as you type. The sound level is tied into your system media volume, so you’ll probably want to set that somewhere in the middle to ensure that you can hear the sounds without them being too over the top. Each letter on your keyboard will play a different note, too, so the words you type will be like mini musical compositions!
make android keyboard play sound as you type

Dont Miss: How to Turn Your Mobile Phone into A Remote Control

Don’t forget to use the share button below to share this post with your friends on social medias.

Source
Read More »
           
deneme bonusu veren siteler